
There could be over 4,000 knots to learn, but the reality is that most sailors get along with only knowing a few. We’ll show you 3 good knots to know, that once learned, will handle most situations that you’ll encounter on your boat. Practice tying these knots to build your muscle memory, because they’ll need to be tied quickly when needed. And yes, they’ll always be needed in low light, windy, rainy and wavy conditions!
Knowing these basic knots will make you more useful as a boater, whether on the lake or around the docks. It’s always nice to help tie out the fenders, catch a line to cleat, or secure a boat to a mooring or piling. So practice away on these knots!
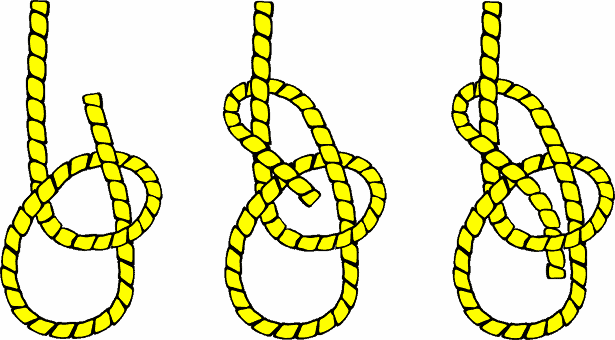
1. Bowline
The bowline is the king of knots. This knot won’t slip, and it’s effective for creating a loop in a line. As a result, you can tie it around a post or other fixed object to make the line fast. It’s also great to tie two lines together. This knot is extremely easy to untie without a load on the line. However, under a load, this knot is very difficult to untie.
HOW TO TIE IT:
Step 1: Form a loop near the end of the line. (How much of the line you leave will depend on how big you want the final knot to be.)
Step 2: Run the end of the line back through that loop.
Step 3: Next, run the line around the standing end and back through the small loop.
Step 4: Now grasp the end and pull the knot tight.
Step 5: You’ll have a large loop now!
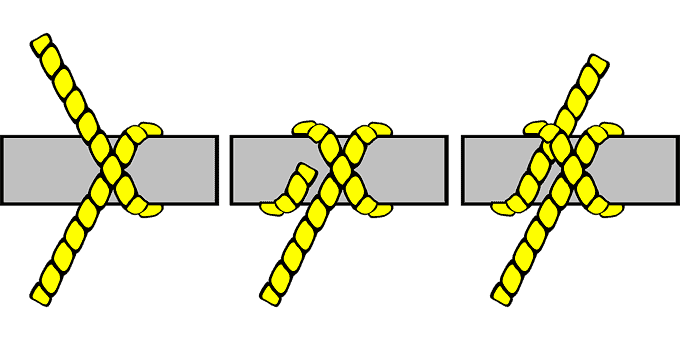
2. Clove Hitch
A clove hitch is an extremely useful and quick knot. Use it to fasten lines to railings, pilings, and posts. It has the advantage of being very quick to tie and untie, but it doesn’t hold nearly as well as the bowline. One of its signature uses is hanging fenders over the side as you come in to dock.
HOW TO TIE IT:
Step 1: Wrap the end of the line around the post or rail.
Step 2: Cross the line over itself and wrap it around the post again.
Step 3: Loosen the last wrap slightly and slip the end under, then pull it taut. This locks the knot.
Step 4: Give it a few pulls to make sure it’s secure, and you’re done!
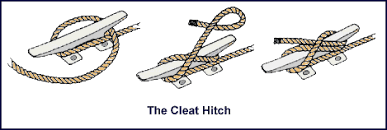
3. Cleat Hitch
The last of 3 good knots to know is technically a hitch, as it is designed specifically for a cleat. This is used constantly on boats, whether you’re docking, towing, or tying alongside. This knot is important to tie right, because it is what likely ties your boat to a dock while you are away.
HOW TO TIE IT:
Step 1: Make a wrap around the base of the cleat. Begin your wrap on the cleat horn furthest away from where the line originates off the boat.
Step 2: Make a figure 8 on the cleat. This works for most situations. If the cleat is big enough and wind/water will be rough, repeat this two or three times.
Step 3: Add a hitch to the final turn to lock it. Do this by making a loop with the tail end underneath, hook it around the cleat, and pull taut. The tail end should be pointing away from the line’s origin.
